Getting Started with Click Post Shipping on Shopify: Preparations and Steps for Independent Shop Owners
You've opened your Shopify store, but you're stuck wondering where to even begin with your shipping settings. Does this sound familiar?
Three years ago, I started setting this up completely from scratch. When I began selling handmade TRRS cables on Shopify, the first challenges I faced were deciding which shipping method to use and figuring out how to actually fulfill orders from Shopify.
The bottom line is that for small, lightweight handmade items, Click Post is the simplest option available. It offers a flat rate of 185 yen nationwide (valid through September 30, 2026; 240 yen starting October 1), includes tracking, and is delivered directly to the recipient's mailbox. Better yet, account registration takes only a few minutes.
In this article, I'll walk you through the preparations and step-by-step procedure to get started with Click Post shipping on Shopify.
What Is Click Post?
A Japan Post Service Offering Nationwide Flat-Rate Shipping for 185 Yen (240 Yen from Oct 1)
Click Post is a parcel delivery service offered by Japan Post designed for small packages. Here is a breakdown of its primary features (rates and size dimensions reflect conditions valid through September 30, 2026, alongside the new conditions taking effect October 1).
| Feature | Details |
|---|---|
| Rate | Flat rate of 185 yen nationwide (240 yen from Oct 1) |
| Maximum size | 34 cm × 25 cm × 3 cm thickness (From Oct 1: 3-side total within 60 cm, longest side within 34 cm, must fit into a collection postbox) |
| Maximum weight | 1 kg (2 kg from Oct 1) |
| Tracking | Available (Japan Post tracking number issued) |
| Delivery method | Delivered to mailbox (no signature or in-person delivery required) |
| Compensation | None |
| Delivery schedule | Daily delivery (including Saturdays, Sundays, and holidays) |
| Payment methods | Yahoo! Wallet or Amazon Pay |
One key point to keep in mind in advance is that Click Post does not provide warranty or damage compensation. While it is not suitable for high-value items or fragile goods, it handles small, durable merchandise like accessories, cables, and stickers remarkably well.
For a detailed look at which items are best suited for Click Post, see our guide on Which Products Are Best Suited for Click Post's Flat-Rate 185 Yen (240 Yen from Oct 1) Shipping?.
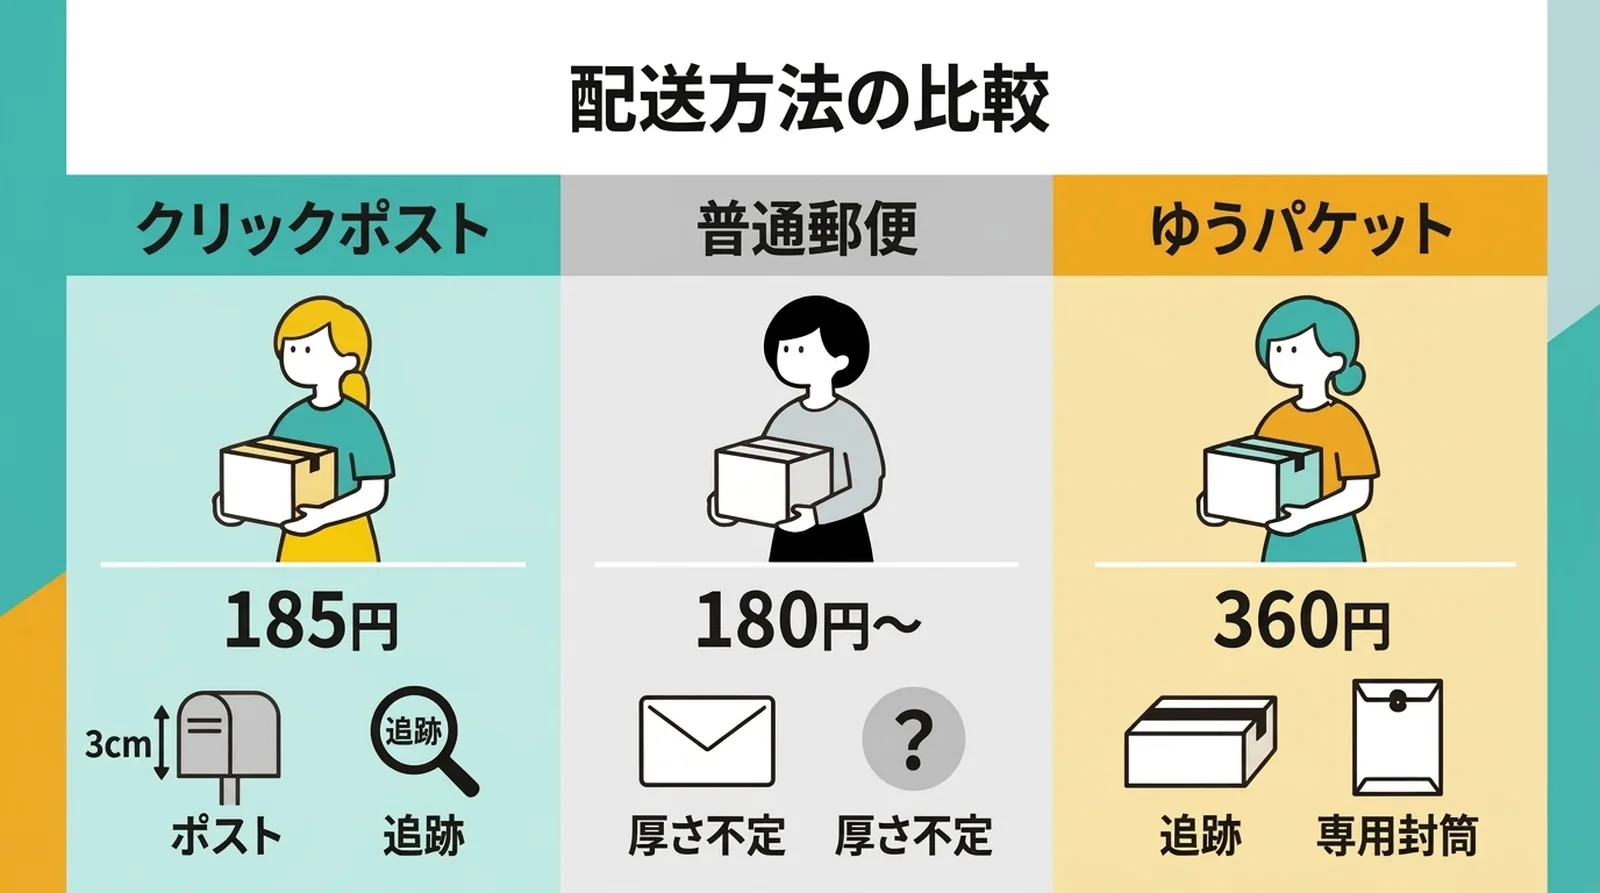
How It Compares to Alternative Shipping Methods
When selecting a shipping method for the first time, many merchants wonder, "Wouldn't nonstandard mail be good enough?" Here is a quick comparison.
| Shipping Method | Rate | Tracking | Mailbox Delivery |
|---|---|---|---|
| Click Post | 185 yen (flat rate, 240 yen from Oct 1) | Available | Supported |
| Nonstandard mail (Standard size, up to 100g) | 180 yen | None | Supported |
| Yu-Packet (Up to 3 cm) | 360 yen | Available | Supported |
While nonstandard mail is slightly cheaper at 180 yen for parcels up to 100g, it does not include tracking. When a customer asks, "Has my order arrived?", you have no way to verify its status. In my case, I initially used nonstandard mail, but the anxiety of shipping without tracking quickly prompted me to switch to Click Post.
Account Registration Steps
Prepare a Yahoo! JAPAN ID or Amazon Account
To use Click Post, you need either a Yahoo! JAPAN ID or an Amazon account. Most people likely already have at least one of these.
Postage payment is also handled through one of these two accounts—specifically via Yahoo! Wallet (with a registered credit card) or Amazon Pay.
Register on the Click Post Website
- Visit the Click Post official website
- Log in with your Yahoo! JAPAN ID or Amazon account
- Agree to the terms of service to complete registration
Registration takes only a few minutes. Because there is no screening or verification process, sole proprietors and individual business owners can start using it immediately.
What You Need to Prepare First
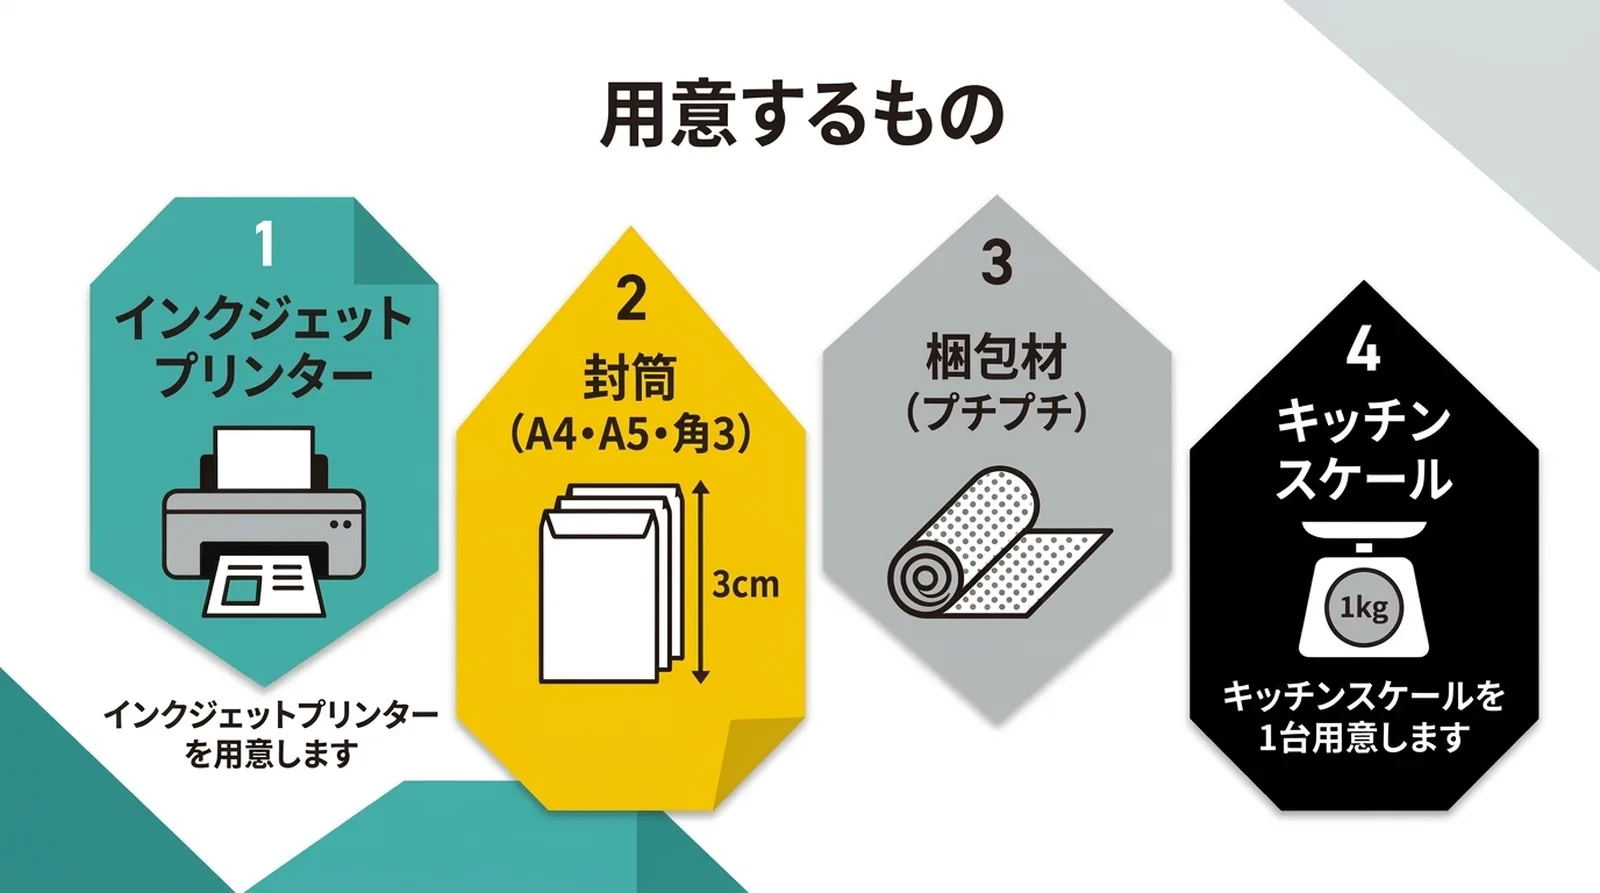
Printer
You print Click Post shipping labels yourself. The system formats them to print four labels per A4 sheet.
A standard household inkjet printer is perfectly fine. Barcode scanning works identically whether printed in color or black-and-white, so monochrome printing is more than adequate if you want to save on ink costs.
Envelopes and Packaging Materials
Click Post's maximum package dimensions are 34 cm × 25 cm × 3 cm thickness (valid through September 30; from October 1 onward, the total of all three sides must be within 60 cm, the longest side within 34 cm, and the package must fit into a collection postbox). Prepare envelopes that fit comfortably within these dimensions.
I primarily use A4-sized envelopes (Kaku 2 envelopes). If your merchandise is smaller, A5-sized envelopes (Kaku 5 envelopes) or Chou 3 envelopes are perfectly fine. You can find all of these at 100-yen shops or home improvement stores.
Having cushioning material (bubble wrap) ready is also very helpful. Since packages are dropped into collection boxes and delivered to mailboxes, I recommend packing items on the assumption that they will jostle against other mail during transport.
Scale
Because the weight limit is 1 kg (2 kg from October 1), you need a scale to verify the combined weight of your merchandise and packaging materials. A standard kitchen scale is all you need; one that measures in 1 g increments is especially convenient.
| Item | Estimated Cost | Purpose |
|---|---|---|
| Inkjet printer | From 5,000 yen | Label printing |
| Envelopes (A4, A5, Chou 3) | 100–500 yen / 50 pack | Packaging |
| Cushioning material (bubble wrap) | 300–500 yen / roll | Product protection |
| Kitchen scale | 1,000–2,000 yen | Weight verification |
In most cases, you can simply repurpose items you already have on hand. Startup costs are practically zero.
How to Connect Shopify with Click Post
The Standard Approach: CSV Export
Shopify and Click Post do not offer a direct native integration. Instead, you connect them by exporting your Shopify order data into a CSV file and uploading that file to Click Post's "Bulk Application" screen.
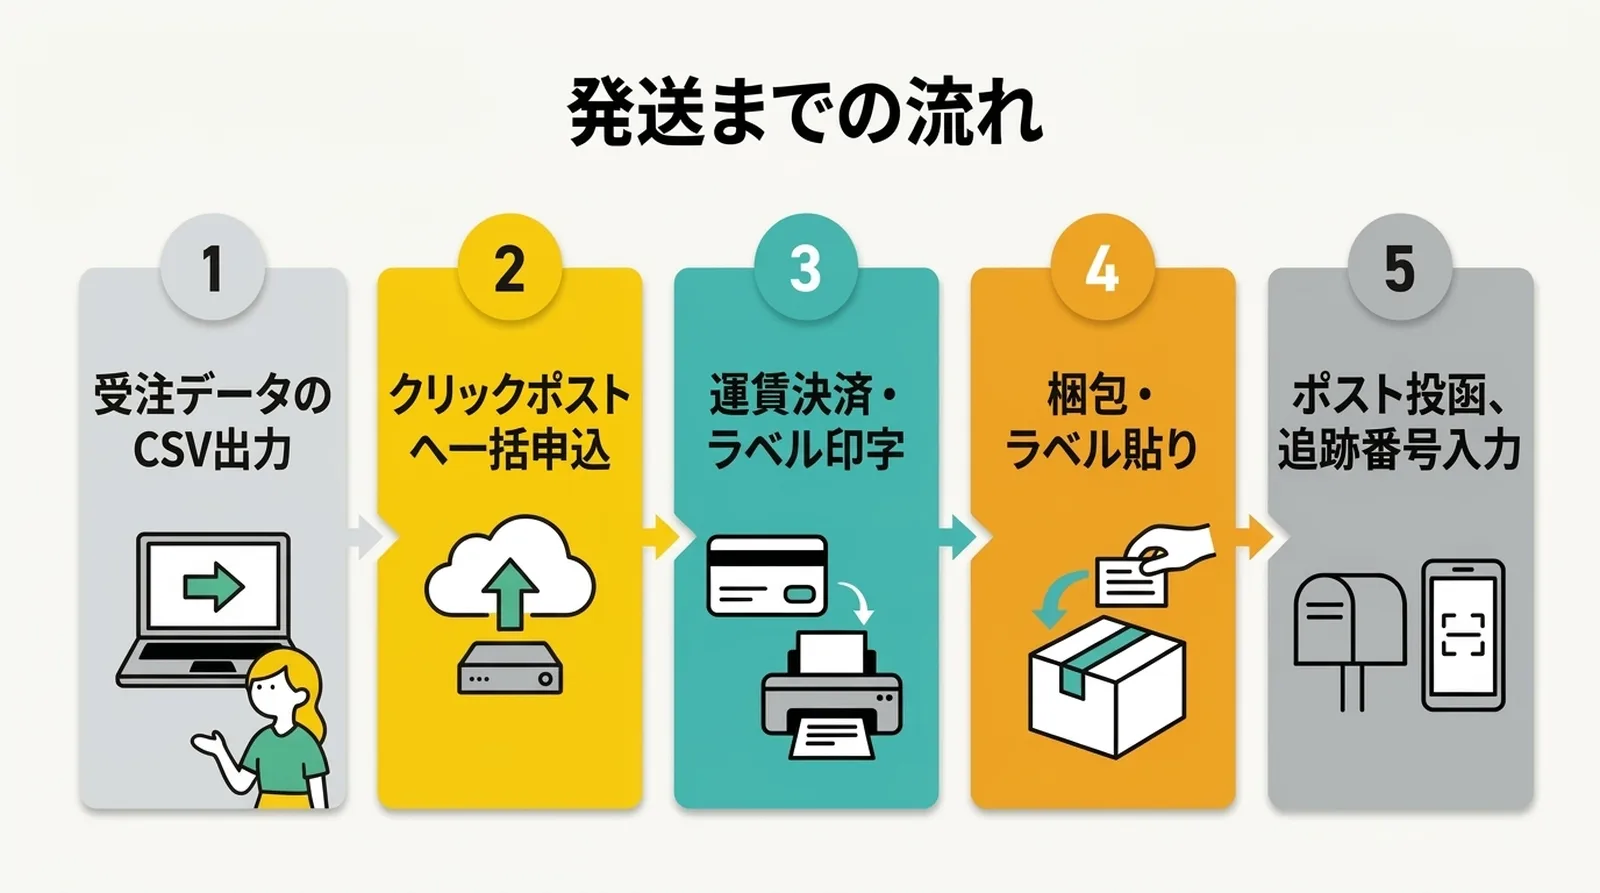
The general workflow is as follows:
- Export Shopify order data to a CSV file
- Upload the CSV to Click Post's "Bulk Application" screen
- Complete payment for each shipment one by one and download the shipping labels
- Print labels, affix them to packages, and drop them into a collection postbox (mailing from a post office counter is permitted through September 30; starting October 1, drop-off must be via postbox as a rule, with counter drop-offs limited to specific exceptional conditions)
- Enter the tracking numbers into each corresponding Shopify order
One crucial distinction to note is that Click Post's "Bulk Application" feature only registers addresses in bulk; you must still process payments individually for each parcel. It does not provide "bulk checkout."
Furthermore, Click Post imposes strict formatting restrictions on CSV addresses. The address section is divided into a maximum of 4 fields, and each field must not exceed 20 full-width characters. Exporting Shopify address data directly without adjustment often exceeds this limit, triggering upload errors.
For detailed instructions and tips on handling CSV exports, see our guide on Optimizing the CSV Export Workflow from Shopify to Click Post.
Tracking Number Sync Often Remains a Manual Chore
Step 5—entering tracking numbers—is where many shop owners hit their first snag. While Click Post generates a tracking number once payment is completed, it provides no built-in mechanism to push that number back to Shopify.
This leaves you opening each order one by one in the Shopify admin and manually copying and pasting tracking numbers. While this takes only about 5 minutes when you have just a few orders, it quickly turns into a tedious chore as order volume grows.
In my case, I developed an app specifically to eliminate this manual tracking entry. It automatically extracts tracking numbers directly from shipping labels and updates Shopify orders in bulk. That said, it is entirely fine to first master Click Post's basic workflow before exploring automation tools.
Completing Your Very First Shipment
Start by Testing with Just a Single Order
Attempting to ship a whole batch of accumulated orders all at once can make troubleshooting overwhelming if you run into problems halfway through. I strongly recommend running through the entire process from start to finish with just a single order first.
- Review the order details in Shopify
- Manually enter the recipient's address on the Click Post website and complete the payment process
- Print the shipping label, package the item, and affix the label
- Drop the package into a collection postbox (mailing from a post office counter is also allowed through September 30; counter drop-off from October 1 onward is restricted to exceptional conditions only)
- Manually enter the tracking number in the Shopify admin and mark the order as fulfilled
For this first order, entering the information manually without dealing with a CSV is more than enough. The main goal is simply to get a clear overview of how the Click Post interface and process flow work.
Switch to CSV Starting with Your Second Shipment
Once you understand the flow from that single test, switch to CSV exports starting with your second batch. Using CSV files lets you process multiple orders at once, significantly boosting efficiency.
Walking through the first order manually will help you understand exactly what each field in the CSV file represents. In the end, this approach leads to a much smoother experience than trying to tackle CSV integration right from the start.
Frequently Asked Questions
Q. Does it cost anything to register for a Click Post account?
No, registration is completely free. You only incur postage charges of 185 yen per shipment (240 yen starting October 1, 2026) each time you send a package, billed through Yahoo! Wallet or Amazon Pay. There are no monthly fees or upfront costs.
Q. Can I ship from convenience stores?
Click Post shipments must be deposited into a collection postbox or handed over at a post office counter (starting October 1, 2026, postbox drop-off is the standard rule; counter drop-offs are restricted to specific exceptions—such as when a postbox is full or out of order, when your shipment volume is expected to exceed postbox capacity, or when a package within regulation dimensions exceeds the slot width—and are strictly limited to packages 3 cm or less in thickness). You cannot process shipments at convenience store checkout counters. Because packages are sized to fit into postbox slots, dropping them into a nearby collection box is by far the most convenient option.
Q. Do shipping labels have an expiration date?
Yes. You must dispatch your package by the shipping expiration date printed on the label. If this date passes, the label becomes invalid, and you will have to restart the payment process from scratch.
Conclusion
Click Post is an ideal shipping option for independent shops, offering nationwide flat-rate delivery at 185 yen (240 yen starting October 1), full tracking, and convenient mailbox delivery.
All you need to get started are four things: a Yahoo! JAPAN ID or Amazon account, a printer, envelopes, and a scale. Account registration takes only a few minutes, and fulfilling your very first order manually will give you a clear grasp of the overall workflow.
From your second shipment onward, you can streamline your operations with CSV exports. And if you want to automate tracking number updates back to Shopify, give Instant Shipping! for Click Post a try.
Further Reading
- Streamlining Shopify × Click Post Shipping — A practical workflow from CSV export to tracking number sync
- Shopify Shipping Settings Guide — Centered around "shipping profiles," configure shipping rate patterns, shipping zones...
- Click Post CSV Export Steps — Concrete operational steps for CSV exports to streamline fulfillment from your second shipment onward